
What is the ITC Editor (Editor Window)?
Summary
The InfraWare 360 platform allows MTs to perform transcription work in the InfraWare Transcription Client (ITC) Editor, or Editor Window.
Overview
Within the ITC Editor, there are six (6) primary elements:
- Document Canvas
- Menu Bar
- Formatting Button Bar
- Workflow Button Bar
- Status Bar
- Function Panel
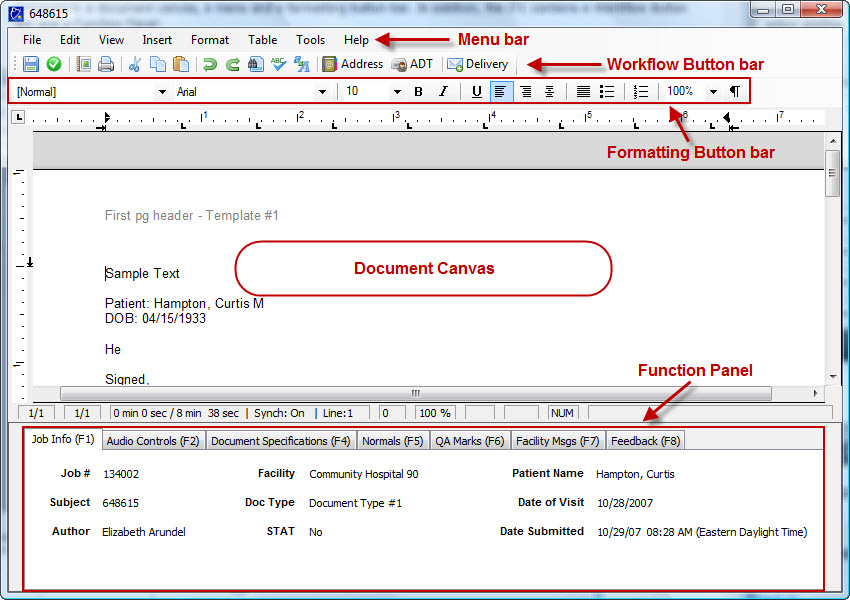
Document Canvas
The Document Canvas is where the document itself is displayed and edited within the Editor Window. The Editor Window supports the use of Placeholders to skip forward or backward within a template, insert Quick Type/Quick Text, and the use of Normals. These are just a few of the key features to be aware of that allow for an enhanced user experience.

Menu Bar
The Menu bar can be used to access nearly any feature. Top level menus include:
- File
- Edit
- View
- Insert
- Format
- Table
- Tools
- Help

File Menu
The File Menu (Alt + F) includes many important features to the Editor Window.
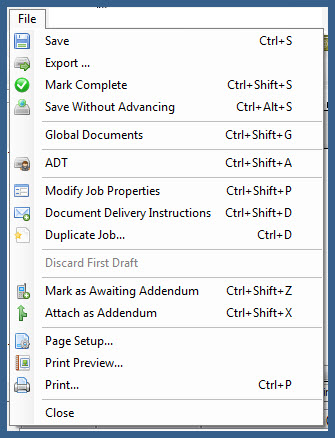
- Save (Ctrl + S)
- Saves the current version of the document to the user's computer until it is marked complete
- Export
- Saves the current version of the document to the user's computer in a *.doc format. This can be disabled by an Administrator. See KB323 for details.
- Mark Complete (Ctrl + Shift + S)
- Saves the document to the platform so it is available for next workflow step. See KB632 for details.
- Save Without Advancing (Ctrl + Alt + S)
- Save the document without advancing the workflow. See KB245 for details.
- Global Documents (Ctrl + Shift + G)
- Access the Global Documents page. The Global Documents feature provides a smooth method for sharing documents with transcriptionists. See KB626 for Administration of this feature.
- ADT (Ctrl + Shift + A)
- Loads the ADT Screen to allow changes to patient demographic data. See KB315 for how to perform an ADT record search, and KB324 for details on Keyboard Shortcuts available in this screen.
- Modify Job Properties (Ctrl + Shift + P)
- Edit the properties of the current job including Author, Facility, Document Category, and Document Type. See KB602 for details.
- Document Delivery Instructions (Ctrl + Shift + D)
- Add, edit, or view the delivery instructions for the document
- Duplicate Job (Ctrl + D)
- Splits the current job, creating a new job (with new job#), when a separate dictation is dictated on the same audio. See KB193 for details.
- Discard First Draft (Alt + D)
- Discards the First Draft. See KB573 for details on this feature.
- Mark as Awaiting Addendum (Ctrl + Shift + Z)
- Selecting this option will save your current changes and halt the job's workflow until an addendum is added. See KB244 for details.
- Attach as Addendum (Ctrl + Shift + X)
- Attach the document to another job. See KB244 for details.
- Page Setup
- Allows user to adjust the paper size and source, as well as the page orientation and margins. This is typically handled by an Admin on the template using the InfraWare Template Editor (ITE).
- Print Preview & Print
- Printing in the ITC can be disabled by an Administrator. See KB322 for details.
Edit Menu
The Edit Menu (Alt + E) includes many options common to word processors but also contains features unique to the ITC and the Editor Window.
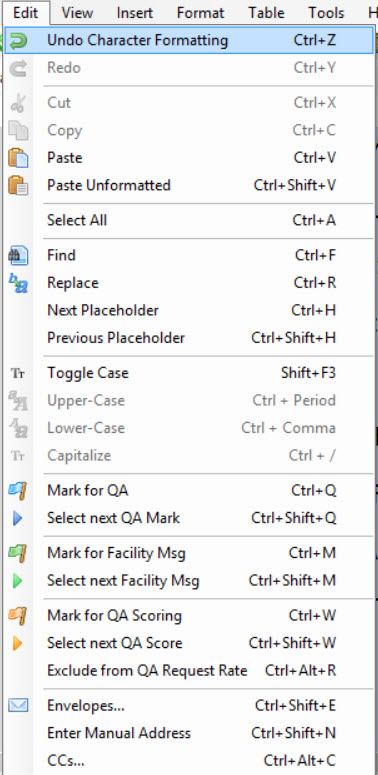
- Common Word Processing Functions with standard Keyboard Shortcuts
- Undo (Ctrl + Z)
- Redo (Ctrl + Y)
- Cut (Ctrl + X)
- Copy (Ctrl + C)
- Paste (Ctrl + V)
- Paste Unformatted (Ctrl + Shift + V)
- Select All (Ctrl + A)
- Find (Ctrl + F)
- Replace (Ctrl + R)
- Unique Editor Window Functions
- Next Placeholder (Ctrl + H) & Previous Placeholder (Ctrl + Shift + H)
- Skips to next Placeholder or Previous Placeholder on the document or template. See KB94 for details.
- Toggle Case (Shift + F3)
- Toggles Case for highlighted text between lowercase, UPPERCASE, InitialCase. Of note, the ITC will check to see if the selection includes a period, exclamation point, or question mark. If one or more are found, then Sentence Case will be used and the first character in the selection will be make upper case, as well as any character that follows a period, exclamation point, or question mark.
- Upper-case (Ctrl + Period)
- Puts the next word in lower-case letters
- Lower-case (Ctrl + Comma)
- Puts the next word in lower-case letters
- Capitalize (Ctrl + /)
- Capitalizes the next letter
- Mark for QA (Ctrl + Q)
- Select Next QA Mark (Ctrl + Shift + Q)
- Select word for next QA Mark
- Mark for Facility Msg (Ctrl + M)
- Select word for Facility Message. This feature is disabled by default. See KB206 for details on this feature.
- Select Next Facility Msg (Ctrl + Shift + M)
- MTs are allowed to send a Facility message to the author to ensure accuracy of job. This feature allows MTs to move from one Facility message to the next. This feature is disabled by default. See KB206 for details on this feature.
- Envelopes (Ctrl + Shift + E)
- Display a list of carbon copies of the job that will be sent via US Mail. These are selected from the Address Book or Manually entered using Insert New Manual Envelope. Extra copies of the document plus envelopes can be printed out at the time the job is complete from the Secure Web Portal.
- Insert New Manual Envelope (Ctrl + Shift + N)
- This feature is used to send an envelope to someone via CC that is not in the Address Book. This allows MTs to add the address manually.
- CC's (Ctrl + Alt + C)
- View and manage the list of CC's added for this job.
View Menu
The View Menu allows users to customize exactly what is seen on the Editor Window. With the ability to add or subtract certain features, users can easily select a visual experience.
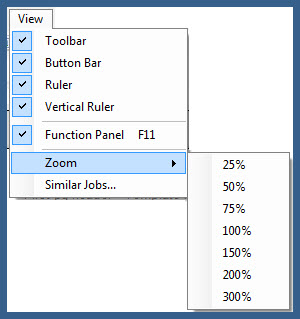
- The Toolbar, Button Bar, Ruler, Vertical Ruler, and Function Panel can all be toggled on and off by simply selecting the option from the View Menu.
- The Zoom option allows you to zoom in or out when viewing the document canvas.
- Similar Jobs (Ctrl + Shift + J)
- The Similar Jobs feature allows an MT to check previous dictations/reports of the same author, patient, or document type. See KB289 for details on this feature.
Insert Menu
.jpg)
- Symbol (Ctrl + Alt + M)
- The Symbol feature allows you to insert a letter or symbol from a library of fonts and styles.
- Image
- To insert an image saved on the your computer, click this feature.
- Headers & Footers
- This feature allows a user to add the following:
- First Page Header
- First Page Footer
- Header
- Footer
- By selecting First Page, the header or footer will only appear on the first page of the document.
- Users can also delete headers and footers within this menu.
- Page Break
- Select this option to insert a page break and begin a new page (Ctrl+J)
- Quick Text & Quick Type
- Quick Type is one of the word expander options built-in to the ITC. For more information, see KB186.
- Quick Text allows you to highlight text and create a shortcut for that text. This allows you to quickly add previously added text. See KB185 for details.
- Section
- This feature allows a user to add a Page or Paragraph section.
- Signature (Ctrl + Alt + Q)
- Adds the Signature Text field which will pull from the author's profile once the job is eSigned. Before esigning text vibrate will appear as "Not Currently Signed."
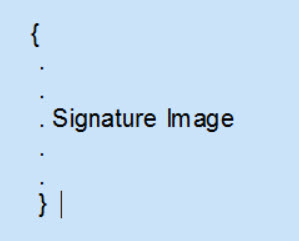
- Signature Image field (Ctrl + Alt + W)
- Adds the Signature Image field which will pull from the author's profile once the job is eSigned. Before esigning only the placeholder will be visible.
- Level 2 Signature (Ctrl + Alt + E)
- Adds the Signature Text field for the Level 2 Signature which will pull from the Second level Esigner's profile once the job is eSigned. Before esigning text verbiate will appear as "Level 2 Not Currently Signed."
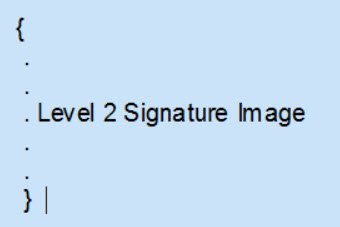
- Level 2 Signature Image (Ctrl + Alt + F)
- Adds the Level 2 Signature Image field which will pull from the Second level Esigner's profile once the job is eSigned. Before esigning only the placeholder will be visible.
- Audio Time Stamp (Ctrl + Alt + T)
- Adds the audio time stamp for the current audio position to the document at the current cursor location.
Format Menu

- Character (Ctrl + Shift + F)
- Allows users to adjust the format of the font and text within the document canvas. Users can adjust/change text font, size, attributes, positioning, and color.
- Paragraph
- Within the Paragraph window, there are two tabs: Formatting & Indents and Frame & Page Breaks
- Formatting & Indents allows users to customize and format the document canvas including alignment, line spacing, left and right indents, and text distances.
- Tabs
- This option allows users to adjust the rules for tabs within the document canvas. Users have the ability to increase the length of a tab as well as adjust the alignment from left to center, right, or decimal.
- Bullets and Numbering
- Adding bullets or numbers to a document can be done so here, including different options and formats.
- Styles
- Users can manage Styles available in the Editor using this option.
- Headers and Footers
- In this window, users can customize the distances from the document's edge by use of headers and footers. Users can choose to apply this to a whole document or just a section.
- Users can also adjust page setup options in this window by clicking on the Margins and Paper tab. Here, margins, paper format, and sections are all adjustable by users.
- Text Color
- Users can change the color of the text in the document. Please note that this would change the delivered document.
- Text Background Color
- Users can add/change background color to text within the document. Please note that this would change the delivered document.
- Document Background Color
- Users can add/change the background color of the entire document display for the MT/QA. This will not change the delivered document, only the display in the Editor for the MT. This will only change the background color for the current job. To change the default background color for all jobs, see KB723 for this user setting option.
- Image
- This function allows users to format an image to the document canvas.
- Increase Hanging Indent (Ctrl + T)
- Selecting this function increases the hanging indent.
- Decrease Hanging Indent (Ctrl + Shift + T)
- Selecting this function decreases the hanging indent.
Table Menu
The Table menu allows users to insert a table within the document and customize it the way that they wish. Users can establish the particular amount of rows and columns to create the table that fits their needs. They can also split the table for different situations as well as adjust the properties to add color or margins as well. After creating a table, users can also add or remove rows and columns to enter additional information.
Tools Menu
The Tools menu allows users to complete a Spell Check of their document, access the Address Book, as well as select synchronous playback. In addition, the User Settings are also available in this menu.
- Spell Check (Shift + F7)
- Options:
- Synchronous Playback (F12)
- Toggles Synchronous Playback on and off. See KB97 for details and how to set the default behavior. Of note, this is an advanced editing feature and should only be used if you have been trained how to use it.
- User Settings
- Manage User Settings: See KB56 for details.
- Address Book (Ctrl + Shift + B)
- See KB230 for details on this feature.
- EMR (Ctrl + Alt + Shift + E)
- See KB698 for details on use of this feature.
- Set Status (Ctrl + F12)
- Masking (Ctrl + Alt + Shift +M)
- Normals (Ctrl + Alt + Shift +N)
- See KB695 for details on MT Normals.
- Account Normals (Ctrl + Alt + Shift + T)
- See KB689 for details on MT Normals.
Help Menu
Under the Help menu, the InfraWare Knowledgebase can be accessed by clicking the 'Help Topics' icon. Further, the Keystroke shortcuts legend for the Editor Window can also be accessed by clicking the 'Keystroke Legend' icon.
Formatting Button Bar
As in other word processors, the Formatting Button Bar allows you to perform the following functions:
- Change the heading, font, and text size
- Format the text to bold, italics, or underline
- Adjust the text alignment (left, right, center, or full)
- Add bullets or numbers
- Toggle the viewing percentage
- Begin a new paragraph

Workflow Button Bar
The Workflow Button Bar also provides features that many word processors possess such as Save, Cut, Copy, and Paste. However, there are also icons and characteristics unique to the Editor Window. From left to right, the buttons are as follows:

- Save
- Mark Complete
- Print Preview
- Print
- Cut
- Copy
- Paste
- Undo
- Redo
- Search
- Spellcheck
- Uppercase
- Address Book
- ADT Entry
- Delivery
The Address Book allows you to search for contacts in the Address Book in order insert carbon copies (CC) and create delivery instructions: Faxing and Attach envelope.
The ADT button reloads the ADT Screen so changes can be made to data field values.
The Delivery button displays all automatic Delivery Instructions for this job and allows the user to add, change, or remove instructions.
Status Bar
The Status Bar is located right above the Function Panel and shows specific information of the document and dictation including page #, time status, Synch (whether audio and text playback are synchronized for First Draft speech recognition results, line position, and zoom percentage.

Function Panel
The Function Panel provides additional information about the document that is essential for the user to know. Each of the following are included in the Function Panel:
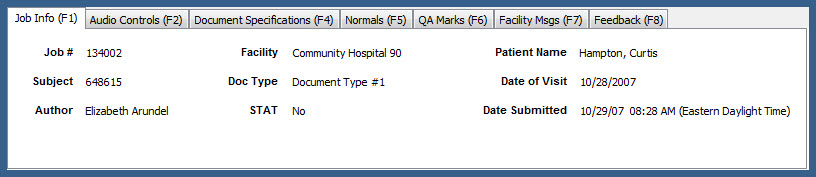
- Job Info (F1)
- Job #, Subject, Author, Facility, Doc Type, STAT, Patient Name, Date of Visit, Date Submitted
- Audio Controls (F2)
- Audio Progress (where in the dictation the audio is playing), Volume, Play Speed, Pitch, Amplification
- Document Specifications (F4)
- If there are specifications for the document, they will be displayed here. Specifications are defined at the Facility level.
- Normals (F5)
- You can use your already created normals to insert text within the document.
- QA Marks (F6)
- This feature allows you to insert QA Marks that shows the Selected Text, the Selected Audio Position, as well as inserting additional notes.
- Facility Messages (F7)
- If you would like to add a message to send to the Facility, you can do so here. Further, the option to force eSign-Off is also available to ensure a message gets seen.
- Feedback (F8)
- If there is any feedback on the job from the Facility, it would be displayed here.
Further, the Function Panel can be toggled off and on to show more of the document by pressing the F11 key. The ITC Editor supports keystroke shortcuts for nearly every command. A legend of those shortcuts can be accessed from the Help Menu or by pressing Shift and F1.
|
